
- Introduction
- Creating a RAUC Signing Certificate
- Installing the RAUC Trust Certificate
- Configuring the RAUC Keyring
- Building the Updated Image
- Creating a RAUC Bundle
- Signing the RAUC Bundle
- Inspecting the Bundle
- Installing the Update
- Understanding the Complete Update Flow
- Boot Verification
- Checking the Final RAUC State
- Demo of RAUC A/B OTA update
- Conclusion
Introduction
This article describes RAUC OTA A/B update on Orange Pi zero board. It will showcase update bundle creation and installing it on target board.
Creating a RAUC Signing Certificate
RAUC bundles should be cryptographically signed so that the target can verify their authenticity before installation.
For development purposes, a self-signed certificate can be generated.
Create a working directory:
mkdir -p ~/rauc-dev
cd ~/rauc-dev
Generate a private key:
openssl genrsa -out development-1.key 4096Generate a self-signed certificate:
openssl req \
    -x509 \
    -new \
    -nodes \
    -key development-1.key \
    -out development-1.cert.pem \
    -days 3650 \
    -subj "/CN=Orange Pi RAUC Development/"
For this development setup, the certificate is used as the trusted CA:
cp development-1.cert.pem ca.cert.pemFor a production system, the key-management strategy should be designed carefully. The private signing key should not be included in the target filesystem.
Installing the RAUC Trust Certificate
The target needs the certificate used to verify signed bundles.
Create:
meta-orangepi-zero/
└── recipes-core/
    └── rauc/
        ├── rauc_%.bbappend
        └── files/
            └── ca.cert.pem
Copy the certificate:
mkdir -p ../meta-orangepi-zero/recipes-core/rauc/files

cp ~/rauc-dev/ca.cert.pem \
   ../meta-orangepi-zero/recipes-core/rauc/files/
Then create:
rauc_%.bbappendwith:
FILESEXTRAPATHS:prepend := "${THISDIR}/files:"

SRC_URI += "file://ca.cert.pem"

do_install:append()
{
    install -d ${D}${sysconfdir}/rauc

    install -m 0644 ${WORKDIR}/ca.cert.pem \
        ${D}${sysconfdir}/rauc/ca.cert.pem
}
The certificate will be installed as:
/etc/rauc/ca.cert.pemConfiguring the RAUC Keyring
The RAUC system configuration must tell RAUC where the trusted certificate is located.
The relevant section is:
[keyring]
path=/etc/rauc/ca.cert.pem
A complete system.conf for this A/B configuration is:
[system] compatible=Orange Pi Zero
bootloader=uboot
boot-attempts=3

[keyring]
path=/etc/rauc/ca.cert.pem

[slot.rootfs.0]
device=/dev/mmcblk0p3 type=ext4 bootname=A

[slot.rootfs.1]
device=/dev/mmcblk0p4 type=ext4 bootname=B
The boot-attempts=3 setting gives the bootloader three attempts to successfully boot a newly selected slot before falling back to another valid slot.
Building the Updated Image
Once the RAUC configuration and certificate have been added:
bitbake core-image-orangepiAfter booting the resulting image, verify that the certificate is installed:
ls -l /etc/rauc/ca.cert.pemAlso verify the RAUC configuration and slot status:
rauc status --detailedCreating a RAUC Bundle
The next step is to create an update bundle containing the new root filesystem.
Create a bundle workspace:
mkdir -p ~/rauc-dev/bundle-v2
cd ~/rauc-dev/bundle-v2
Copy the generated root filesystem:
cp ~/Desktop/yocto/poky/build/tmp/deploy/images/orangepi-zero/*rootfs*.ext4 \
   ./rootfs.ext4
Create:
manifest.raucmwith:
[update]
compatible=Orange Pi Zero
version=2.0
description=Orange Pi Zero RAUC A/B update test

[bundle]
format=plain

[image.rootfs]
filename=rootfs.ext4
type=ext4
The manifest describes the bundle compatibility, version and root filesystem image.
Signing the RAUC Bundle
The bundle is created using the private signing key and certificate:
cd ~/rauc-dev/bundle-v2

rauc bundle \
    --cert=../development-1.cert.pem \
    --key=../development-1.key \
    . \
    orangepi-zero-v2.raucb
The resulting directory contains:
bundle-v2/
├── manifest.raucm
├── rootfs.ext4
└── orangepi-zero-v2.raucb
Inspecting the Bundle
The bundle can be inspected with:
rauc info orangepi-zero-v2.raucbIf the host does not have a configured keyring, RAUC may report:
No keyring file or directory providedFor inspection purposes, verification can be disabled:
rauc info orangepi-zero-v2.raucb --no-verifyA valid bundle should report information similar to:
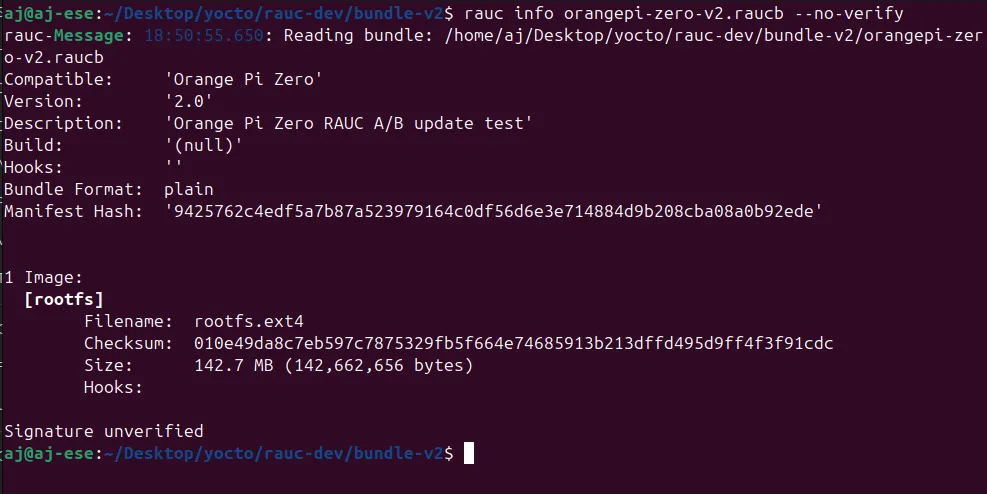
The bundle also contains a signature that the target system can verify against its configured RAUC keyring.
Installing the Update
Transfer:
orangepi-zero-v2.raucbto the Orange Pi Zero.
The update can then be installed with:
rauc install orangepi-zero-v2.raucbRAUC determines the inactive slot and installs the new root filesystem there.
For example, if the system is currently running from slot A:
Current:
    A = active
    B = inactive
RAUC installs the new version into B. The bootloader is then configured so that the next boot attempts to start B.
If B successfully boots, it can be marked as good. If it repeatedly fails to boot, the boot-attempt mechanism provides a path back to A.
Understanding the Complete Update Flow
The resulting architecture can be summarized as:
                   RAUC bundle
                       │
                       ▼
              ┌─────────────────┐
              │ Verify signature │
              └────────┬────────┘
                       │
                       ▼
              ┌─────────────────┐
              │ Identify active │
              │ slot            │
              └────────┬────────┘
                       │
                       ▼
              ┌─────────────────┐
              │ Install into    │
              │ inactive slot   │
              └────────┬────────┘
                       │
                       ▼
              ┌─────────────────┐
              │ Update U-Boot   │
              │ boot selection  │
              └────────┬────────┘
                       │
                       ▼
                    Reboot
                       │
                       ▼
              ┌─────────────────┐
              │ U-Boot selects  │
              │ new slot        │
              └────────┬────────┘
                       │
                       ▼
                 New system boots
                       │
              ┌────────┴────────┐
              │                 │
            Success            Failure
              │                 │
              ▼                 ▼
        Mark slot good      Decrement
                            attempts
                                │
                                ▼
                         Fall back to
                         previous slot
This separation of responsibilities is important:
- RAUC manages the software update and bundle verification.
- U-Boot determines which root filesystem should boot.
- libubootenv provides Linux userspace access to the U-Boot environment.
- Yocto produces the complete bootable image and integrates the required configuration.
- The A/B partition layout provides the isolation needed to update one system while another remains available.
Boot Verification
During boot, U-Boot reports the selected slot and remaining attempts.
For example:
Executing script at 42000000
RAUC: Found valid slot A, 1 attempts remaining
Saving Environment to MMC...
Writing to MMC(0)... OK
RAUC: Loading kernel from mmc 0:3
5500848 bytes read in 228 ms (23 MiB/s)
RAUC: Loading device tree from mmc 0:3
23688 bytes read in 3 ms (7.5 MiB/s)
RAUC: Starting slot A
U-Boot then loads the kernel and device tree from the selected root filesystem:
Kernel image @ 0x46000000
Flattened Device Tree blob at 49000000
Booting using the fdt blob at 0x49000000
Starting kernel ...
This confirms that the bootloader is selecting the RAUC slot and loading the corresponding kernel and device tree.
Checking the Final RAUC State
Once Linux has booted, run:
rauc status --detailedThe expected result is that one slot is marked as booted and the other is inactive.
For example:
=== System Info ===
Compatible: Orange Pi Zero
Booted from: rootfs.0 (A)

=== Bootloader ===
Activated: rootfs.0 (A)

=== Slot States ===

o [rootfs.1] (/dev/mmcblk0p4, ext4, inactive)
    bootname: B
    boot status: good

x [rootfs.0] (/dev/mmcblk0p3, ext4, booted)
    bootname: A
    mounted: /
    boot status: good
At this point, the basic RAUC A/B infrastructure is operational.
Demo of RAUC A/B OTA update
Conclusion
Integrating RAUC into a Yocto-based Orange Pi Zero system requires coordination between several layers of the embedded Linux stack.
The key elements are:
- Add
meta-raucto the Yocto build. - Configure U-Boot for a persistent environment.
- Create a U-Boot boot script that implements A/B slot selection.
- Reserve a shared boot partition and two root filesystem partitions.
- Add RAUC and
libubootenvto the image. - Configure
/etc/fw_env.configso Linux can access the U-Boot environment. - Enable kernel loop-device support.
- Create a trusted RAUC certificate and install it on the target.
- Configure the RAUC keyring.
- Build and sign a RAUC bundle.
- Install the bundle into the inactive root filesystem slot.
- Let U-Boot boot and verify the new slot.
The resulting design provides the essential building blocks for reliable A/B updates: the currently running system is preserved while the inactive slot is updated, the update is cryptographically verified, and the bootloader can fall back when the new slot does not boot successfully.
This implementation can subsequently be extended with production certificate management, remote OTA delivery, application hooks, automatic health checks, watchdog integration, and more sophisticated rollback policies.

Leave a Reply